Tuesday, October 21, 2008

Mesh Point Repeats Scarf - Wider Width

An original design by Sandi Marshall

This scarf is made in a 4-dc mesh. I have written row by row directions and have also created a chart to go with it, for anyone who prefers to work filet crochet from a chart. Anyone who is new to filet crochet can make the scarf from the row by row directions but could also compare these directions to the chart to become familiar with filet crochet chart reading.

Materials: I crocheted the example with Coats and Clark TLC Cotton Plus light worsted weight yarn in color Hot Pink. US size H crochet hook.
You will need about 3 1/2 oz. for every 10 repeats (a repeat is rows 2 - 8).
When made with the materials listed, one repeat of rows 2 - 8 equals 3 1/4 inches in length. 10 repeats = about 32 1/2 inches in length. A scarf in this pattern that is 65 inches long will require about 7 oz. of yarn (when made with the materials listed). Most scarves are at least 60 inches long. Longer scarves are 70 - 80 inches long. Everyone has their own preference for scarf length.

Size: When made with the materials listed, the scarf is about 6 3/4 inches wide (without any outside round added). The length is determined by the number of repeats you choose to do.

Gauge: 4 dc = 1 inch, 2 dc rows = 1 inch. Gauge is not crucial for this pattern, unless for some reason, you want your scarf to be the exact measurements of the example. Scarves come in a wide variety of widths and lengths, so yours can successfully vary from the gauge of the example. As long as you are happy with your result, that's what counts.

Abbreviations: ch = chain, ch-2 sp = chain-2 space, dc = double crochet, ea = each, sc = single crochet, sp = space

Pattern Notes: You will turn at the end of each row. Please keep my copyright and terms of use with the pattern directions when you print out or save the pattern in any form. Thank you.

The photo at the bottom of this page can be helpful to refer to when crocheting rows 1 - 8 the first time through. The photo shows a close look at the placement of the stitches used in crocheting once through the repeat of the pattern. If you find that you have questions, refer to that photo first to see if that will clear up your question. If it doesn't, feel free to ask your question in the comments section of this pattern page.

This pattern is written in US American English crochet pattern terms.
Starting Chain: Leaving a strand to weave in later, chain 29.
Row 1: sc in 2nd ch from the hook, sc in ea ch across. (28 sc)
Row 2: ch 3 (counts as first dc), dc in ea of next 3 sc, (ch 2, skip next 2 sc, dc in next sc) 3 times, dc in ea of next 3 sc, (ch 2, skip next 2 sc, dc in next sc) 3 times, dc in ea of next 3 sc.
Row 3: ch 3 (counts as first dc), dc in ea of next 3 dc, (ch 2, skip next ch-2 sp, dc in next dc) twice, 2 dc in next ch-2 sp, dc in ea of next 4 dc, 2 dc in next ch-2 sp, dc in next dc, (ch 2, skip next ch-2 sp, dc in next dc) twice, dc in next 2 dc, dc in top of ch-3 at end of the row.
Row 4: ch 3 (counts as first dc), dc in ea of next 3 dc, ch 2, skip next ch-2 sp, dc in next dc, 2 dc in next ch-2 sp, dc in ea of next 4 dc, ch 2, skip next 2 dc, dc in ea of next 4 dc, 2 dc in next ch-2 sp, dc in next dc, ch 2, skip next ch-2 sp, dc in ea of next 3 dc, dc in top of ch-3 at end of row.
Row 5: ch 3 (counts as first dc), dc in ea of next 3 dc, 2 dc in next ch-2 sp, dc in next dc, (ch 2, skip next 2 dc, dc in next dc) twice, 2 dc in next ch-2 sp, dc in next dc, (ch 2, skip next 2 dc, dc in next dc) twice, 2 dc in next ch-2 sp. dc in ea of next 3 dc, dc in top of ch-3 at end of row.
Row 6: ch 3 (counts as first dc), dc in ea of next 6 dc, 2 dc in next ch-2 sp, dc in next dc, ch 2, skip next ch-2 sp, dc in next dc, ch 2, skip next 2 dc, dc in next dc, ch 2, skip next ch-2 sp, dc in next dc, 2 dc in next ch-2 sp, dc in ea of next 6 dc, dc in top of ch-3 at end of row.
Row 7: ch 3 (counts as first dc), dc in ea of next 9 dc, 2 dc in next ch-2 sp, dc in next dc, ch 2, skip next ch-2 sp, dc in next dc, 2 dc in next ch-2 sp, dc in ea of next 9 dc, dc in top of ch-3 at end of row.
Row 8: ch 1, sc in first dc, sc in ea of next 12 dc, 2 sc in ch-2 sp, sc in ea of next 12 dc, sc in top of ch-3 at end of row.
Additional Repeats: Repeat Rows 2 - 8 as many times as needed to reach the length that you want for your scarf.

Finishing: If desired, make an outside round to finish the edges, by making 2 sc around the post of each dc and one sc around the sc on the end of each sc row as you come to it. When you come to the short side of the scarf (the scarf end), make one sc in each stitch across that end then continue working around the posts of the stitches on the end of the rows, as done on the first long edge, sc along other short edge when you come to it and end with a slip stitch in the sc that began the outside round. Add fringe to the ends, if desired.

If you prefer to work filet crochet from a chart: Following is the chart that goes along with the row by row instructions above. For the scarf, you will make a row of single crochet before beginning the chart and will make a single crochet row after the last row shown on the chart before beginning the next repeat of the rows on the chart. When you have made as many repeats of the chart as you wish, to have the scarf length you desire, make one final row of single crochet.

Copyright, Terms of Use: This is a copyrighted pattern, created by Sandi Marshall, October 2008. You can help me to be able to continue designing new patterns by honoring copyright law regarding my patterns. In other words, do not republish my chart, pattern directions or images on another web page, blog or elsewhere (even if it would be distributed for free; which, when done without my permission would still be a violation of copyright law). Do not distribute reproduced copies of this pattern, even for free. I can't stress enough how important this is. Instead, you may give others the URL for this page so that they may come to this site for themselves. I appreciate that very much.


The photo above shows rows 1 - 8 so that you can see more clearly the placement of the stitches used in crocheting one repeat of the pattern.

Friday, October 17, 2008

Mesh Point Repeats Scarf - Medium Width

An original design by Sandi Marshall

This scarf is made in a 3-dc mesh. I have written row by row directions and have also created a chart to go with it, for anyone who prefers to work filet crochet from a chart. Anyone who is new to filet crochet can make the scarf from the row by row directions but could also compare these directions to the chart to become familiar with filet crochet chart reading.

Materials: I crocheted the example with Caron Simply Soft worsted weight yarn in color Berry Blue. US size H crochet hook.

The photo on the left shows 3 repeats. You will need about 3 1/2 oz. for every 12 repeats (a repeat is once through rows 2 - 8). When made with the materials listed, one repeat of rows 2 - 8 equals 3 1/2 inches in length. 12 repeats results in a length of about 39 inches. Most scarves range in length anywhere from 60 - 80 inches long, so you should plan to have at least 7 oz. of yarn for this project; more if you prefer extra long scarves. Everyone has their own personal preference for scarf length.

Size: When made with the materials listed, the scarf is about 3 3/4 inches wide. The length is determined by the number of repeats you choose to do.

Gauge: 4 dc = 1 inch, 2 dc rows = 1 inch. Gauge is not crucial for this pattern, unless for some reason, you want your scarf to be the exact measurements of the example. Scarves come in a wide variety of widths and lengths, so yours can successfully vary from the gauge of the example. As long as you are happy with your result, that's what counts.

Abbreviations: ch = chain, ch-1 sp = chain-1 space, dc = double crochet, ea = each, sc = single crochet, sp = space

Pattern Notes: You will turn at the end of each row. Please keep my copyright and terms of use with the pattern directions when you print out or save the pattern in any form. Thank you.

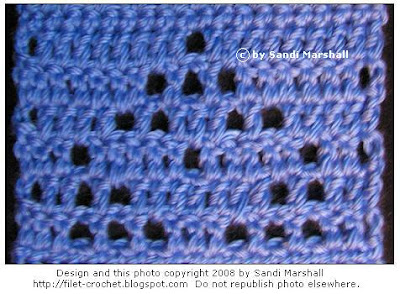
The photo at the bottom of this page can be helpful to refer to when crocheting rows 1 - 8 the first time through. The photo shows a close look at the placement of the stitches used in crocheting once through the repeat of the pattern. If you find that you have questions, refer to that photo first to see if that will clear up your question. If it doesn't, feel free to ask your question in the comments section of this pattern page.

This pattern is written in US American English crochet pattern terms.
Starting Chain: Leaving a strand to weave in later, chain 20.
Row 1: sc in 2nd ch from the hook, sc in ea ch across. (19 sc)
Row 2: ch 3 (counts as first dc), dc in ea of next 2 sc, (ch 1, skip next sc, dc in next sc) 3 times, dc in ea of next 2 sc, (ch 1, skip next sc, dc in next sc) 3 times, dc in ea of next 2 sc.
Row 3: ch 3 (counts as first dc), dc in ea of next 2 dc, (ch 1, skip next ch-1 sp, dc in next dc) twice, dc in next ch-1 sp, dc in ea of next 3 dc, dc in next ch-1 sp, dc in next dc, (ch 1, skip next ch-1 sp, dc in next dc) twice, dc in next dc, dc in top of ch-3 at end of the row.
Row 4: ch 3 (counts as first dc), dc in ea of next 2 dc, ch 1, skip next ch-1 sp, dc in next dc, dc in next ch-1 sp, dc in ea of next 3 dc, ch 1, skip next dc, dc in ea of next 3 dc, dc in next ch-1 sp, dc in next dc, ch 1, skip next ch-1 sp, dc in ea of next 2 dc, dc in top of ch-3 at end of row.
Row 5: ch 3 (counts as first dc), dc in ea of next 2 dc, dc in next ch-1 sp, dc in next dc, (ch 1, skip next dc, dc in next dc) twice, dc in next ch-1 sp, dc in next dc, (ch 1, skip next dc, dc in next dc) twice, dc in next ch-1 sp. dc in ea of next 2 dc, dc in top of ch-3 at end of row.
Row 6: ch 3 (counts as first dc), dc in ea of next 4 dc, dc in next ch-1 sp, dc in next dc, ch 1, skip next ch-1 sp, dc in next dc, ch 1, skip next dc, dc in next dc, ch 1, skip next ch-1 sp, dc in next dc, dc in next ch-1 sp, dc in ea of next 4 dc, dc in top of ch-3 at end of row.
Row 7: ch 3 (counts as first dc), dc in ea of next 6 dc, dc in next ch-1 sp, dc in next dc, ch 1, skip next ch-1 sp, dc in next dc, dc in next ch-1 sp, dc in ea of next 6 dc, dc in top of ch-3 at end of row.
Row 8: ch 1, sc in first dc, sc in ea of next 8 dc, sc in ch-1 sp, sc in ea of next 8 dc, sc in top of ch-3 at end of row.
Additional Repeats: Repeat Rows 2 - 8 as many times as needed to reach the length that you want for your scarf.

Finishing: If desired, make an outside round to finish the edges, by making 2 sc around the post of each dc and one sc around the sc on the end of each sc row as you come to it. When you come to the short side of the scarf (the scarf end), make one sc in each stitch across that end then continue working around the posts of the stitches on the end of the rows, as done on the first long edge, sc along other short edge when you come to it and end with a slip stitch in the sc that began the outside round. Add fringe to the ends, if desired.

If you prefer to work filet crochet from a chart: Following is the chart that goes along with the row by row instructions above. For the scarf, you will make a row of single crochet before beginning the chart and will make a single crochet row after the last row shown on the chart (before beginning the next repeat of the rows on the chart). When you have made as many repeats of the chart as you wish, to have the scarf length you desire, make one final row of single crochet.

Shown on the chart are rows 2 - 7 (row 1 and row 8 are single crochet rows).
Copyright, Terms of Use: This is a copyrighted pattern, created by Sandi Marshall, October 2008. You can help me to be able to continue designing new patterns by honoring copyright law regarding my patterns. In other words, do not republish my chart, pattern directions or images on another web page, blog or elsewhere (even if it would be distributed for free; which, when done without my permission would still be a violation of copyright law). Do not distribute reproduced copies of this pattern, even for free. I can't stress enough how important this is. Instead, you may give others the URL for this page so that they may come to this site for themselves. I appreciate that very much.


The photo above shows rows 1 - 8 so that you can see more clearly the placement of the stitches used in crocheting one repeat of the pattern.

Tuesday, October 14, 2008

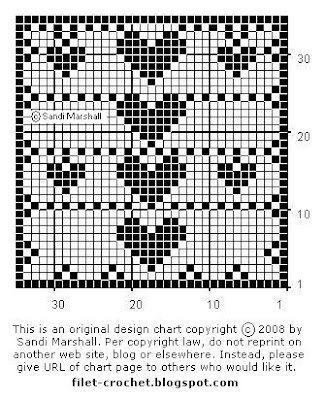
My Favorite Things Banner - Filet Crochet Heart Theme Pattern to Personalize


To the finished banner, add theme buttons, charms or appliques, sewn on within the area of each heart to personalize the banner to reflect your favorite things. This could also make a great gift for someone that you know well. It could be fun to find sew-on items in the themes that would fit that person. An occupation, interests, hobbies, favorite sports, favorite animals, pets. Another idea would be to add just a few theme buttons or appliques to the banner and let the other person share the fun of deciding what else to add. Novelty buttons, charms and appliques are found in the craft sections of many stores and can also be found online. Home-Sew has some interesting choices in their online store and print catalog. I found the dragonfly in the craft section of Wal-Mart.


The following instructions are written in US American English crochet pattern terms. If you are used to British English crochet patterns terms, the translation for the American English dc (double crochet) is a British English tr (treble) and the translation for the American English sc (single crochet) is a British English dc (double crochet).

In US American English crochet pattern terms:
Banner Tabs (make 3): These banner tabs will be sewn on, along the top edge, when the filet crochet piece is finished.
Note: You will turn at the end of each row.
Starting Chain: Leaving a length to weave in later, chain 8.
Row 1: sc in 2nd chain from hook, sc in each chain across. (7 sc)
Row 2: ch 3 (counts as first dc), dc in each of next 6 sc. (7 dc)
Row 3 - 7: ch 3 (counts as first dc), dc in ea dc across (7 dc)
Row 8: ch 1, to turn. sc in ea dc across. (7 sc)
End off, leaving a length for sewing the tab to the filet crochet piece.
When Banner Piece is Completed From Chart:
Finishing, Sewing on Tabs: Position the three tabs along the top of the piece and mark the spots to sew on, using sewing pins or some sort of marker. The example at the top of this page can give you an idea for possible placement of the tabs (your tab placement doesn't have to be exactly like the example). Fold the first tab in half, with the wrong sides held together and sew the two bottom edges of the tab in place along the top of the filet crochet piece, using a large-eye sewing needle and the lengths that you left at the beginning and end when crocheting the tab. Leave the sides of the tabs open. On the back of the banner, weave in leftover ends of the lengths to secure, weaving back and forth under some of the stitches several times, so that the ends will not unravel with use. Repeat this process of sewing on with the other two tabs.

A wooden dowel can be inserted through the three tabs. Craft dowels can be found at hobby and craft stores, such as A.C. Moore, Michaels Arts and Crafts or Jo-Ann Stores.

Crocheting the Banner:
In this design, the hearts will look closest to the dimensions shown on the chart, if you work the chart in 3-dc mesh. If you work the chart in 4-dc mesh, the hearts will look wider than they appear on the chart image, while remaining the same height as shown on the chart.

On the chart, the white squares indicate open mesh and the black squares indicate solid mesh.

Materials: Use thread size or yarn weight of your choice. For instance, size 10 crochet thread with a US size 7 or 8 steel hook, for a smaller banner or worsted weight yarn with a US size H hook, for a larger banner (worsted weight yarn option is about 21 inches wide x 20 inches tall, when made in 3-dc mesh).

For a 3-dc mesh, chain 74 for a starting chain and begin with a double crochet made in the 5th chain from the hook, to begin the first (bottom right) solid mesh of the chart. On this chart, the first row is all solid mesh, so the second and all additional solid mesh of the first row are made by making a double crochet in each chain of the starting chain. Continue to follow the chart for placement of each open mesh and solid mesh across each row; the first row on the chart was followed right to left and the next row will be followed left to right. Continue following the chart in this manner.

Solid Mesh - On the chart, for 3-dc mesh, if the first mesh of the row is a solid mesh being made over a solid mesh of the previous row, directions = ch 3 (counts as first dc), dc in each of next 2 dc. Any other solid mesh in the row = if made over a solid mesh, then dc in ea of next 2 dc or if made over an open mesh = dc in next chain-1 space, dc in next dc.

In this design, the first mesh of every row is a solid mesh.

Open Mesh - On the chart, for 3-dc mesh, for any open mesh in the row, directions = if made over a solid mesh, then chain 1, skip next dc, dc in next dc or if made over an open mesh, directions = chain 1, skip next chain-1 space, dc in next dc.

If you opt to work the chart in 4-dc mesh:
For a 4-dc mesh, chain 109 for a starting chain and begin with a double crochet made in the 5th chain from the hook, to begin the first (bottom right) solid mesh of the chart. On this chart, the first row is all solid mesh, so the second and all additional solid mesh of the first row are made by making a double crochet in each chain of the starting chain. Continue to follow the chart for placement of each open mesh and solid mesh across each row; the first row on the chart was followed right to left and the next row will be followed left to right. Continue following the chart in this manner. Basics of 4-dc Mesh Filet Crochet

Once a person is familiar with the basics of filet crochet, row by row written instructions are not needed for each new chart.

Solid Mesh - On the chart, for 4-dc mesh, if the first mesh of the row is a solid mesh being made over a solid mesh of the previous row, directions = ch 3 (counts as first dc), dc in each of next 3 dc or if the first mesh of the row is a solid mesh that is being made over an open mesh, then directions = ch 3 (counts as first dc), 2 dc in chain-2 space, dc in next dc. Any other solid mesh in the row = if made over a solid mesh, then dc in ea of next 3 dc or if made over an open mesh = 2 dc in next chain-2 space, dc in next dc.

Open Mesh - On the chart, for 4-dc mesh, if the first mesh of a row is an open mesh being made over a solid mesh, directions = ch 5 (counts as first dc and a chain-2), skip next 2 dc, dc in next dc or if the first mesh of a row is an open mesh being made over an open mesh, directions = ch 5 (counts as first dc and a chain-2), skip next chain-2 space, dc in next dc. Any other open mesh in the row, directions = if made over a solid mesh, then chain 2, skip next 2 dc, dc in next dc or if made over an open mesh, directions = chain 2, skip next chain-2 space, dc in next dc.

If you show on the Internet your own photo of a banner that you made using my pattern, please kindly include a link to this pattern page so that anyone who may want the pattern, can find this site and print the pattern out for themselves. Thank you. I appreciate that.

This is a copyrighted pattern. After seeing many copyright violations of my patterns over the years, I have learned the hard way that the following terms of use are necessary for those who are acting upon untrue myths, instead of facts, about copyrights or who don't realize the damage that copyright violations do to designers. Be aware that patterns that a designer chooses to place on the Internet as free patterns are protected by the same copyright laws as patterns that are purchased. Being on the Internet does not make it public domain! This pattern is free for your personal, non-commercial use only, meaning that you can make items using it for yourself or for gifts but that you may not sell items made using my design without my express written permission in legal paperwork form and payment of a fee for that commercial use of my design. Of course, per copyright law, the pattern (including the chart) is not to be reprinted on another web site or elsewhere and cannot be given to others as reproduced copies (which would be illegal, pirated copies). Instead, please give the link to this page so that anyone who wants the pattern may come to this site for themselves. Thank you. I appreciate it. If you wish to use any of my patterns on another web site, blog or in print publications, please email me to discuss a fee and exchange legal paperwork for that use.

Friday, October 3, 2008

Bat with Swirl Border, Charted for Filet Crochet

An original design by Sandi Marshall


This charted design could be used to make a filet crochet piece that could be used as a banner. Another idea would be to use it as the center for a lapghan or larger afghan. Some will want it for Halloween display, while others will enjoy it for year round use. I've sometimes had requests for bat designs from crocheters who live in Australia, where bats are commonly seen. Other crocheters look for bat theme patterns to make as gifts for people who are collectors of items that display bats within the design.


The following instructions are written in US American English crochet pattern terms. If you are used to British English crochet patterns terms, the translation for the American English dc (double crochet) is a British English tr (treble).

In US American English crochet pattern terms:
For a 4-dc mesh, chain 111 for a starting chain and begin with a double crochet made in the 9th chain from the hook, to form the first (bottom right) open mesh of the chart. On this chart, the first row is all open mesh, so the second and all additional open mesh of the first row are made by making 2 chains, skipping 2 chains of the starting chain, then making a double crochet in the next chain of the starting chain. Follow the chart for placement of each open mesh and solid mesh; the first row on the chart was followed right to left and the next row will be followed left to right. Continue following the chart in this manner. Once a person is familiar with the basics of filet crochet, written instructions are not needed for each new chart.

For help photo, see Basics of 4-dc Mesh Filet Crochet

On the chart, the white squares indicate open mesh and the black squares indicate solid mesh.

Abbreviations: dc = double crochet

Solid Mesh - On the chart, for 4-dc mesh, if the first mesh of the row is a solid mesh being made over a solid mesh of the previous row, directions = ch 3 (counts as first dc), dc in each of next 3 dc or if the first mesh of the row is a solid mesh that is being made over an open mesh, then directions = ch 3 (counts as first dc), 2 dc in chain-2 space, dc in next dc. Any other solid mesh in the row = if made over a solid mesh, then dc in ea of next 3 dc or if made over an open mesh = 2 dc in next chain-2 space, dc in next dc.

Open Mesh - On the chart, for 4-dc mesh, if the first mesh of a row is an open mesh being made over a solid mesh, directions = ch 5 (counts as first dc and a chain-2), skip next 2 dc, dc in next dc or if the first mesh of a row is an open mesh being made over an open mesh, directions = ch 5 (counts as first dc and a chain-2), skip next chain-2 space, dc in next dc. Any other open mesh in the row, directions = if made over a solid mesh, then chain 2, skip next 2 dc, dc in next dc or if made over an open mesh, directions = chain 2, skip next chain-2 space, dc in next dc.

This is a copyrighted pattern. After seeing many copyright violations of my patterns over the years, I have learned the hard way that the following terms of use are necessary for those who are acting upon untrue myths, instead of facts, about copyrights or who don't realize the damage that copyright violations do to designers. Be aware that patterns that a designer chooses to place on the Internet as free patterns are protected by the same copyright laws as patterns that are purchased. Being on the Internet does not make it public domain! This pattern is free for your personal, non-commercial use only, meaning that you can make items using it for yourself or for gifts but that you may not sell items made using my design without my express written permission in legal paperwork form and payment of a fee for that commercial use of my design. Of course, per copyright law, the pattern (including the chart) is not to be reprinted on another web site or elsewhere and cannot be given to others as reproduced copies (which would be illegal, pirated copies). Instead, please give the link to this page so that anyone who wants the pattern may come to this site for themselves. Thank you. I appreciate it. If you wish to use any of my patterns on another web site, blog or in print publications, please email me to discuss a fee and exchange legal paperwork for that use.

Taking the Mystery Out of 4-dc Mesh Filet Crochet

by Sandi Marshall

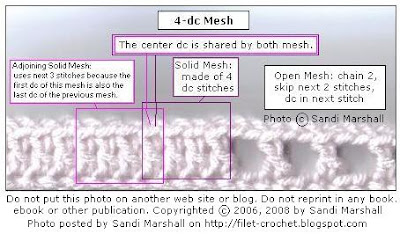
Filet crochet is made up of open mesh and solid mesh. The width of the mesh can be over 3 double crochet (3-dc mesh) or over 4 double crochet (4-dc mesh).


In 4-dc mesh, the first mesh of the row uses all four double crochet but each extra mesh of the row is made over only the next three double crochet. That is because the mesh share the double crochet that is in the middle of two mesh (that middle double crochet is the last one of the first mesh but also counts as the first one of the next mesh). It's easier to understand this by taking a close look at my photo above.

The following instructions are written in US American English crochet pattern terms. If you are used to British English crochet patterns terms, the translation for the American English dc (double crochet) is a British English tr (treble).

In US American English crochet pattern terms:
Solid Mesh in 4-dc Mesh -
If the first mesh of the row is a solid mesh being made over a solid mesh of the previous row, directions = ch 3 (counts as first dc), dc in each of next 3 dc

If the first mesh of the row is a solid mesh that is being made over an open mesh, then directions = ch 3 (counts as first dc), 2 dc in chain-2 space, dc in next dc.

Any other solid mesh in the row:
If made over a solid mesh, then dc in ea of next 3 dc
If made over an open mesh = 2 dc in next chain-2 space, dc in next dc

Open Mesh in 4-dc Mesh -
If the first mesh of a row is an open mesh being made over a solid mesh, directions = ch 5 (counts as first dc and a chain-2), skip next 2 dc, dc in next dc.

If the first mesh of a row is an open mesh being made over an open mesh, directions = ch 5 (counts as first dc and a chain-2), skip next chain-2 space, dc in next dc.

Any other open mesh in the row:
If made over a solid mesh, then chain 2, skip next 2 dc, dc in next dc
If made over an open mesh, directions = chain 2, skip next chain-2 space, dc in next dc

Many crocheters really get hooked on filet crochet, once the basics are understood and they are comfortable with working directly from a chart, without needing written row by row directions for each new chart. Filet crochet pieces are beautiful and have varied uses. Charts can be worked in crochet thread or with any weight of yarn (the thinner the materials are that you use, the smaller the finished piece will be). An edging can be added to a thread crocheted piece to result in a doily (that is square, rectangular, oval or round, depending on the shape of the chart). Crocheted tabs can be added at the top of a finished filet crochet, to use for inserting a wooden dowel, making the filet crochet piece into a decorative banner. A filet crochet worked in yarn can become the center of an afghan by adding any number of additional rounds around the outside edge of the finished filet crochet piece. Those are just a few ideas to get your imagination going.

Browse this blog for some of my charted designs that I have created and made available as free charts for your enjoyment.

Article and photo copyright 2008 by Sandi Marshall. Do not copy to another web site, blog, ebook or print publication. Links to this page are welcome.